Over this past weekend I set out to create a camera tally device for the Spyder video processor. Specifically, I wanted to try to use my relatively new Raspberry Pi 2 board running the Windows 10 IoT Core operating system to make something useful. If you’ve read through my older blog posts, you’ve likely noticed that the Spyder is still my go-to target platform for playing with new technologies. Let’s face it – when you’re playing with shiny new toys, it helps to mate it up with something you know very well so you don’t feel completely lost. Before I get into the details, check out this brief video showing a working tally controller in action:
The whole process of building this device was simply fantastic. The barrier to entry for people making hardware devices has gotten incredibly low over the past couple years, both from a cost and ease of development perspective. The whole build process was very quick, and I had such a great time with it that I went ahead and put together a full 30 minute hardware and software video walk-thru for the project (more on this below).
Getting Started Making your own
To get started making your own, here are a couple links for the main hardware used on this project, as well as the wiring diagram for your reference.
Raspberry Pi 2 Kit ($70): Amazon Link
8-Channel Relay Board ($9): Amazon Link
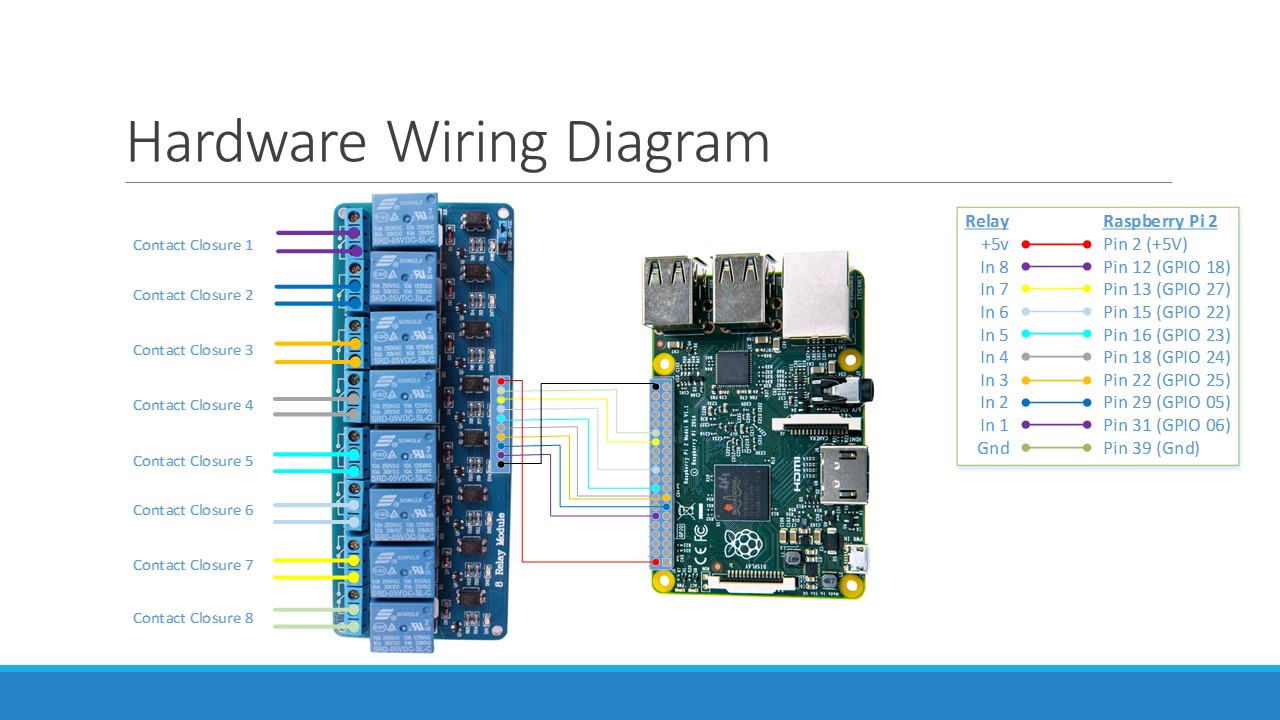
Hardware Wiring Diagram for our Tally Controller
Links to the full source code, documentation resources, and a full YouTube walk-thru video are below. This video has a ton of valuable information in there, covering the hardware specifics, Spyder implementation details, and the full process of creating our software application. This is the first time I’ve gone through and made something this elaborate (and narrated the video), and I’ll be very interested to know what you think of it (so leave me a comment below if you’re so inclined).
GitHub Project (Source Code and Documentation): Click Here
Next Steps
The tally controller we’ve created is certainly functional. but in it’s initial form the server IP address and tally source lists are hard-coded. In the next stage of this project, we’re going to build a desktop application that can connect to the device remotely over the network and view/configure these properties. We’ll also explore creating a user interface to run on the Pi’s HDMI output, which could be useful for monitoring and troubleshooting the device.
Until next time, take a look through those walk-thru video and the resources in the Github repository, and try to make one yourself. I hope you enjoy going through this content as much as I enjoyed making it.
Love the project and I just ordered the parts. I had started play with Visual studio again a couple weeks ago so now I was project to tinker with it on. I am new to the pi, so that will be my first thing to go after.
I was planning to use a BMD tally box and start snooping it out, probably still will, but this is a very cool way to do it.
Great presentation of your project with the videos.
Thanks for putting this out there for us all to enjoy.
JMW
Hi Derek,
I have previously built a tally system for our PPU which reads our For-A mixer RS422 data and other GPIO inputs and then broadcasts the tally data as UDP packets and was looking at your spyder tally and thinking it’d be nice to roll it all into one box. I’ve built the project in VS 2015 using SpyderClient 1.0.1 and everything compiles and runs on the pi but my sourcesOnProgram list always stays null – the pi is definitely connected to the spyder as I can see the data coming in when I add a breakpoint and step through. Is there any chance you could take a look and see if you can spot where I’ve messed up. Here’s a link to my project files and a vap for an X20 that I was testing against.
Many thanks,
Dan
Hi again Derek,
Please disregard my previous reply – it was working after all, it’s my lack of knowledge of the Visual Studio environment that made me think otherwise. I hadn’t wired up any output LEDs either so these things in conjunction made me think I had somehow missed a step !
Thanks for a great tutorial.
Dan
The VS project tells me that project.json does not exist on disk – and doesn’t load the project.
Any ideas?
Looks like the project format wasn’t compatible with Visual Studio 2017. I just pushed an update to the Git repository that updates the project format and the Windows IoT target version to 1803 (latest as of this writing). Also updated Nuget package reference to SpyderClientLibrary to support X80. Pull down latest and let me know if you still have issues, or better yet file an issue up on the SpyderTallyController git page as I don’t check the blog comments often enough 🙂
Derek:
I cant seem to get VS 2016, and am having issues with VS 2017. I’m not sure what plug ins I need.
any help would be great.
Hi Jon! Looks like the project format wasn’t compatible with Visual Studio 2017. If you go and grab latest from Git you should be able to get it running now – I just updated the project to work with Visual Studio 2017.
Fully patched Windows 10 machine with VS2017 Community.
Trying to add KnightwareCore 3 via the NuGet Package Manage:
Severity Code Description Project File Line Suppression State
Error CS0012 The type ‘DispatcherPropertyChangedBase’ is defined in an assembly that is not referenced. You must add a reference to assembly ‘KnightwareCore, Version=3.0.0.0, Culture=neutral, PublicKeyToken=null’. SpyderTallyController \\fs\it\SpyderTallyController-master\src\SpyderTallyController\MainPage.xaml.cs 66 Active
Severity Code Description Project File Line Suppression State
Error Package restore failed. Rolling back package changes for ‘SpyderTallyController’. 0
VS2017 was the culprit. it was failing updates and I didn’t know.
Derek, what a great project. Thanks for the putting out all the info on how on how you did it.
Have you ever got around to updating it with a UI to alter preferences and IP addresses?
I’m not much of a coder, so I doubt I could compile this on my own, but I’d sure be willing to spend a few dollars for some help with it.
Have you used this yet on an x80?
Hi Zack! It does work with the Spyder X80, as long as the SpyderClientLibrary nuget library is up to date. I never did come back around to build out a user interface to configure this, but it’s not off the table that a future update could still happen 🙂
FYI – querying source status became easier in the 5.4.0 release of the X80 software, which includes a new ‘Request Active Sources’ (RAS) command that does the heavy lifting of getting the sources active in preview/program. It’s still a poll, but it’s a relatively lightweight poll against the Spyder server that can be implemented easily in external automation devices. I believe there is a native implementation of this the Widget Designer that make it easy to read layer status and actuate relays.
Derek:
Will this tally work with the X80, I have been using it without any fails on the X20. But we now have an X80 and It doesn’t seem to work.
If you need an X80 to try new code out with let me know, I’m sure we can find some time for that to happen
Hello! My bad here – I didn’t notice this note until just a couple days ago. Earlier in the year I had updated the SpyderClientLibrary package that this project uses to collect Spyder server data, and that version of the library seems to work just fine with X80. I wonder if you might just need to pull down the latest version of the code from Github and load it on your Pi?
Earlier this year I was working on re-building this app for Linux (still targeting the Raspberry Pi), and these days you’ll see that under the /src folder there is both a Windows and a Linux sub-folder. These each contain their own versions of the app, and the Linux variant has a working web interface for configuration and monitoring and even supports running an LCD front panel! This effort fell by the wayside when my work life picked up, but it was almost complete. It’s very encouraging to hear of someone using this project out there, and so I’m going to try to get some documentation and an updated blog post together shortly to help others get this working. Stay tuned.
Drop me a note in the meantime if you still don’t have luck getting the X80 working with the latest version of the existing app for Windows IoT Core. It should work, but full disclosure is that the quick testing I ran against it earlier today was using the newer Linux app (which uses the same SpyderClientLibrary package as the Windows app).