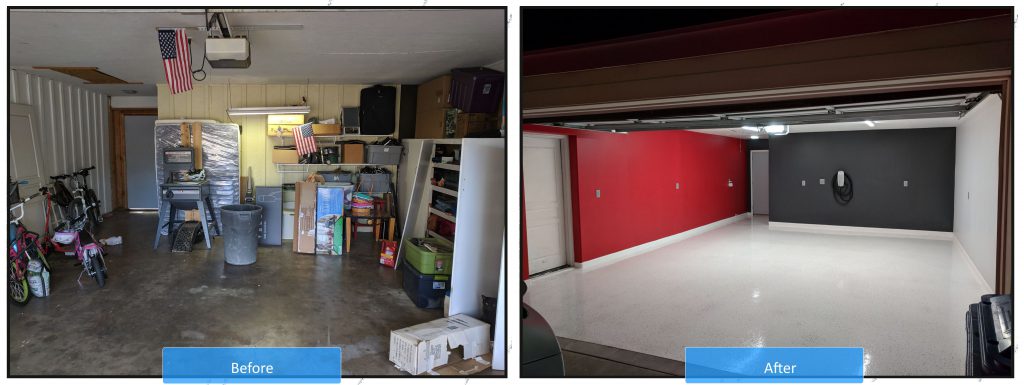
In December I pulled the trigger and ordered a new Tesla Model X. Being more of a computer on wheels than a car with a cool computer and autopilot system, this car speaks to me on a level deeper than I can comprehend. The time from order to delivery was a little over three months, and it became apparent immediately that it would need a worth garage to call it’s home. This blog post is a chronicle of the creation of just such a garage.
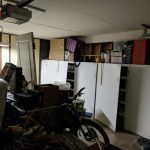
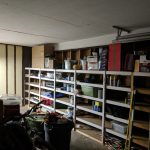
Where we Started
The garage had years worth of stuff packed into every corner, and hadn’t seen a car actually parked in it for quite some time. I wouldn’t allow my shiny new car to bake in the driveway, so initially it seemed obvious that a clean-out and maybe some paint on the walls and cabinets was in order.
-
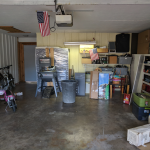
- Garage full of stuff
First Attempt
At first all I really wanted to do was paint the walls and cabinets, and clean up the junk that I had accumulated over the years. As the space cleared out and I went to painting, I started noticing how the cabinets weren’t really in great shape, and were starting to crumble. I went to painting anyway, but realized quickly that there wasn’t going to be much of an improvement. I got through a couple walls, but didn’t even get to painting the cabinets. I knew this was going to become a much bigger project…
-

- Wall primed
-

- Two-Tone colored wall
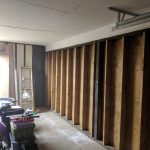
Tearing it all Down
The cabinets were garbage. I ripped out all the cabinetry, and then was faced with bare studs that would need some drywall. The garage had previously been a carport, and so the walls it did have were exterior walls or just bare studs. These exterior walls were 1/2″ wood with slats, and I finally broke down and ripped all that out as well. The covering of the uneven wall along the house came out and revealed a door and a window that had been covered over on the other side during a previous remodel. One wall after another, I kept tearing more and more down until I had pulled almost all walls, with the exception of half the wall running along the house, down to the studs.
-

- Old cabinets need to go
-
- Cabinet junk to re-home
-

- Stripped cabinets
-
- Exterior wall stripped
-
- Back wall stripped
-

- Window behind wall
-

- Door behind wall
Adding more Power
While the studs were exposed, I added electrical outlets to the outside and back walls, and ran the power line up to the attic. I also added a pair of 8′ LED strip lights which look like fluorescent fixtures to give the room a brilliant white light. This lighting alone was a major improvement both for working in the garage as well as the finished product.
I had an electrician come in to wire up the outlets to a new 20-Amp breaker, as well as wire a new circuit to an 80-Amp Tesla wall charger unit which would live on the back wall of the garage. We had a few surprises – my electrical box is 3-phase, wasn’t grounded, and needed some work to fit some new breakers. We got through it in a few days, but between the Tesla wall charger, parts, and labor the whole endeavor set me back just over $2,000.
-

- Glamour shot with box
-

- Temporary wall mount
-

- Ready for power wiring
-

- Horrible electrical box
-

- Wires thru attic
-

- Powered and ready
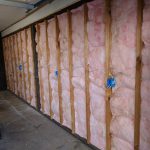
Building it Back Up
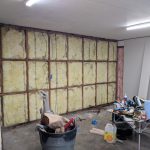
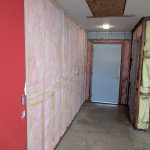
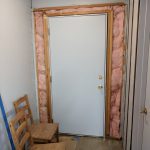
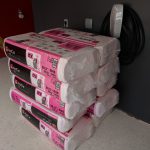
I framed out the half of the previously uneven wall against the house. The garage is notoriously an oven in the summer, so I decided to insulate all the walls and the attic while I had the opportunity. The ceilings are 8′ high, so I initially put in drywall strips vertically (they come 8′ x 4′). About the time I finished I found out that I should be putting a 1/2″ gap between the floor and the drywall, and also using special ‘green board’ drywall which is treated to resist moisture. I ripped all my hard work out and started again with new green board. There were some ceiling gaps that I fixed up along the back wall due to the prior 1/2″ wood boards being thicker than my new 1/4″ drywall.
To mud and tape the drywall together, I hired a professional. That is an art in itself, and I figured for all my work I wouldn’t want to do a bad job here and not get the benefit of clean/smooth walls. Had him mud the entire ceiling while he was in there, to get rid of the prior texture and some other holes and cracks that needed to go. $950 later I had something starting to resemble a legitimate garage again.
-

- Home Depot Merch
-

- Ready to rock
-

- Framed house wall
-
- Insulated house wall
-
- Insulating the back door
-

- Insulated other wall
-

- Insulated outside wall
-
- Better outside wall shot
-

- More Insulation…
-

- Drywall for outside wall
-

- Contiguous house wall
-

- Lots of greenboard now
-

- More drywall
-

- Back and outside walls
-

- Outside wall
-

- Ceiling patching
-

- More Ceiling Patching
-

- Mud/Tape Sanding
-

- Don’t Breathe this stuff
-

- Ceiling Insulation
-
- 10 bags=way too much
Finishing the Job
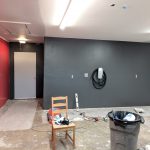
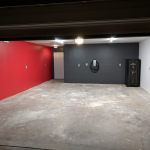
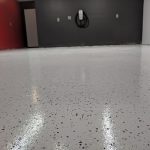
Painting the walls was easy, but painting the ceiling was much more difficult than expected. I stayed up many nights until 2AM just painting, and the excitement as it started to look like a showroom fueled me to push hard. With the walls painted, the floor became an instant eye-sore. It quickly became apparent I was going to need to go all the way and epoxy the floor. The idea of a showroom look had taken hold, so I committed to going with a white color.
The prep work and application of the epoxy floor took as much time as the walls. I ground down the floors with a large grinder rented from the Home Depot. I ground down along the walls by hand using a hand grinder. Then I acid washed the entire garage to prep the concrete. Then I spent hours sealing cracks in the concrete to ensure a smooth surface. This process alone spanned weeks and cost a couple hundred dollars. The actual epoxy (two coats) and associated sealer/hardener (also two coats) cost around $600 and also spanned over a week due to curing time between coats.
The very final step was trim, which I waited several weeks before knocking out. Simple white, pre-primed trim pieces went up in an afternoon, and after a quick bead of silicon caulking I was finally done.
-

- Garage door painted
-

- Handy Paint Reference
-
- Walls and ceiling done
-

- Rented a floor grinder
-

- Grinding is super messy
-

- Ground down floor
-

- Drying after acid wash
-
- Epoxy and hardner
-
- Epoxy applied
-

- Adding trim
-

- Finer trim work
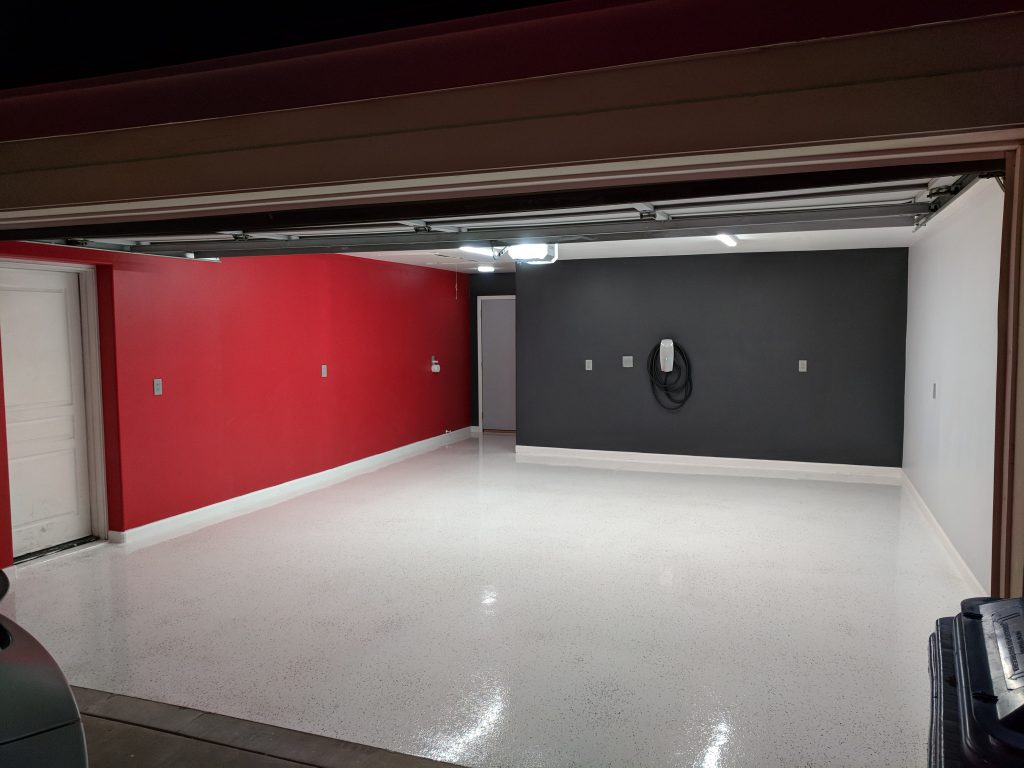
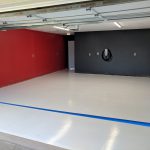
Completed Garage Renovation
Overall Thoughts Now that it’s done
At the outset if you told me I would spend over $5,000 to renovate my garage, I likely wouldn’t have started at all. But that’s not how great projects work. This garage is awesome, and makes me happy. Sometimes I go out to my car, stop, and pull out my phone to take a picture or two. It looks walking into a showroom every day. It’s worth it, and I hope for everyone to have something that brings them recurring joy like this. It’s a prefect compliment to the car, which also brings me boundless joy.
For those wondering or hating on the white floor – I mop it once a week and it looks brand new again after three months. The car doesn’t drip random oil or other fluids on the ground, so at worst you end up with some tire tracks after a few days. If you live somewhere rainy, your mileage may vary. In Phoenix Arizona it’s not bad.
Future Stuff
I would very much like to install three of the Tesla PowerWalls and some solar. Beyond the energy benefits, the visual design of those PowerWalls would really look amazing along that red wall in the garage.
I need to build a home for my bike, which is now living in the back yard. It’s covered, but it’s also an expensive machine that shouldn’t be left outside. I already have some plans for this – look for that in another post soon.