Monthly Archives: September 2010

Bitmap Borders and Shadows: Part 1 of n

In this next series of posts, I’m going to discuss the bitmap borders and shadows (BBS) feature that first appeared in Vista Advanced 3.5.0.  If you haven’t played with them yet, you owe it to yourself to do so. 

This first blog post will discuss how (and when) you can use the feature, how it works under the covers, and how to get the best possible performance from it.  If you have no idea what the bitmap borders and shadows feature is, take a look at the action shot below.

358

The image above shows two related features, bitmap borders and shadows and window titling.  I’m going to skip over titling for this post, and concentrate only on the bitmap border / shadow feature.

What Can I do With Bitmap Borders?

Bitmap borders goes beyond the traditional supported borders to enable custom shapes and fills to be defined.  Shadows applied will keep the same shape as the bitmap border, and can even have a color other than black defined (not shown).

one layer

Features Shown:

  1. Non-Rectangular window (rounded edges in this example)
  2. Image file used as border texture
  3. Shadow shape that matches the border shape

The Spyder software comes with about a dozen border shapes that you can use, as well as a number of images that can be used to texture the border.  Of course you can create and use custom shapes and fill images, which I’ll be discussing in detail in the next blog post.

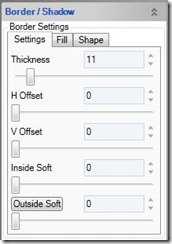
The KeyFrame property panel contains handles for all of the available bitmap border and shadow adjustments, and I’ve included a few screenshots of the most interesting ones below.  Using them is pretty self explanatory, and so I won’t bother going through them exhaustively.

border settings border texture border shape
General Settings Border Texture Border Shape


So How Does It Work?

Under the covers, the border / shadow settings selected are used to generate a specially formatted image at a size relative to the input video resolution, which gets loaded once into the target layer where it is in turn merged with the video each frame. The Images below show this process.

Example - Source Video Frame Buffer (2048×1200)

In this frame buffer, the active video is repositioned so that it will fit correctly when merged with the border image loaded.  These offsets are programmed by the server as part of the image loading process

Example - Border Bitmap  Buffer (2048×1200)

This buffer stores the generated image which will be merged with the video.  Special bit values are encoded into the image to specify what area of the image should be mixed with the video and which area should be mixed with the VI.

Example - Both Resulting Image

Once the image is loaded, the hardware in the X20 layer will perform the video cutout and merge the image with the border on a frame-by-frame basis.

Note that the image sequence above makes a point to call out the frame buffer sizes in the layer hardware; a size of 2048×1200.  This is important because the generated image file previously mentioned needs to fit within these dimensions.  Since the image file must be loaded relative to the input video resolution, there may not be enough ‘free’ frame buffer space to generate the desired effect. 

In cases where there isn’t enough space to fit the requested bitmap border / shadow settings, the server will automatically scale back the border offset and then the border thickness until the image fits.

Also note that the image files generated can be relatively large, and in almost all cases you really need to be running a still server to ensure a good experience.  While technically the bitmap borders will work when using traditional USB loading, the image load times detract much of the experience.  There is additional information on the still server on the Vista forum site, and I’ve additionally just completed a post describing the still server here.

Where Bitmap Borders Won’t Work

There are a few scenarios where bitmap border functionality isn’t available, and this section attempts to list them all to save you from surprises in the field.

  • Input Resolutions above 2048 wide OR 1200 high.  This causes the layers to enter a special mode that uses two layer frame buffers, and there is no bitmap border support when in this mode.

  • Running a VI height above 1850.  When your running a VI at a height above 1850, certain layers cannot support still images, effectively disabling bitmap borders.

Tips for Getting the Best Experience

While certainly not required, the recommendations presented here are sure to be extremely beneficial for anyone using the bitmap border / shadow feature set.

Use a Still Server

I know I mentioned this already once in this post, but it can’t possibly be stressed enough.  If your using bitmap borders and shadows (or stills for that matter), then plunk down a few hundred bucks and buy a PC to hook up to your X20 for use as a still server.  The speed performance improvement when using this accessory can easily be over 10x. 

Build Treatments to Recall Bitmap Border Settings

Using treatments is good practice in general, but the load times involved with adjusting bitmap borders and shadows make it an even more beneficial practice.  Instead of manually adjusting KeyFrame parameters each time you want to setup a bitmap border, just make a treatment for the looks you use most frequently (border / shadow treatment settings include bitmap border options).  Not only does this clean up the workflow for the operator, the on-screen experience is nicer since the system will use the smooth go processor to automatically pull the layer off screen while loading the border.

Summary

I always like knowing how things work under the hood, and if your like me then hopefully this has shed a little light on how the bitmap border and shadow feature works.  In the next post, I’m going to discuss how you can create your own custom border shapes and use them with the Spyder X20.

Using a Still Server with Spyder X20

While the still server has been a supported option for Spyder X20 and URS since the initial product release, I’m still surprised to see the number of people who either aren’t aware of it or don’t understand it’s usefulness.  Since it’s usage is essentially a core requirement when using the bitmap border and shadow features I’m planning to blog about shortly, I figured I’d provide a thorough explanation of what it is, how it works, and why you should care.

Traditional Image Loading (No Still Server)

First a little history lesson:  In a traditional scenario where a still server is not in use, images are transferred from the internal X20 computer to the hardware using an internal USB 2.0 hardware link.  This link is fairly slow, and depending on the size of the image being loaded there may be a delay of several seconds to complete a transfer to a hardware input or output frame buffer.  Note that this is the method used on the Spyder 200/300 series systems.  The image below shows a high-level overview of this process. 

image
Figure 1: Image loading without a still server

This approach has a few disadvantages.  As mentioned previously, the image load time can be substantial (over a minute in the case of backgrounds).  Under the covers on the server, there is a substantial amount of CPU and memory being consumed to process and stream the image out to the hardware.  The resulting effect during periods of moderate to heavy still usage can be characterized as a noticeably sluggish ‘feel’ to the system.

Enhanced Image Loading (Enter the Still Server)

When the Spyder X20 was designed, a special DVI-D input connector was added to the output board which is labeled ‘OpMon Input’ (yes the name is incredibly misleading), which allows us to increase still loading speed by relying on an external PC connection.  This external PC, typically referred to as a Still Image Server, runs a special application that connects to the existing Spyder network and listens for requests to display image files. 

image
Figure 2: Still Server Network / Video Wiring Diagram

When configured to use a still server, the Spyder X20 / URS server will offload the image loading instruction to the still server, and then simply instruct the hardware to do a frame capture of the image on the OpMon input and transfer the image into the target input / output frame buffer (see sequence below).

image
Figure 3: Image loading using a still server

This has a number of benefits, the largest of which is the raw speed increase when loading images.  The other big side effect is the reduction in CPU and memory usage on the X20 server, since the ‘heavy lifting’ gets moved off to the still server PC and the X20 hardware.

The description above about how the still server works has been  oversimplified, and there are a number of tricks employed to handle edge cases; scenarios like images with alpha channels being being captured, or where the image is larger than the still server’s output resolution.  Be assured, these are supported scenarios that still reap huge benefits from the still server.

What Scenarios Benefit from a Still Server?

In short, pretty much any operation in an X20 / URS system that loads a still image to a layer or an output will see a large benefit from using the still server.  Below is an exhaustive list, which might contain a few you may not have considered:

  • – Backgrounds (HUGE performance boost)
  • – Stills on layers
  • – Test Patterns (layers / outputs / PixelSpaces)
  • – Bitmap Borders / Shadows
  • – Window Titling
  • – SourceMonitor overlays

Performance Tips

Use a Gigabit network

When using that still server, keep in mind that image files are transferred from the X20 / URS server over the network, and so you can get an additional boost from the still server when your using a Gigabit network for communication.

Use a still server PC with a decent graphics card

While the still server application isn’t a particularly demanding application, it is a graphics application that will take advantage of hardware acceleration where it can.  If your out looking for a new PC to run as your still server, look for something with a decent ATI or NVidia (preferred) graphics card.  If the PC your looking at has one of those Intel Extreme Graphics chipsets, keep looking…

Summary

For many scenarios, the still server is a must-have accessory for the X20 / URS system, and considering the low cost of PC hardware there really isn’t a good reason not to have one.  If your not already using one, do your self a favor and get one.